
This post is likely going to be pretty long as I will be documenting all of my progress on the second level of Construct. This will cover everything from my research through to designing and then building.
Getting started
I was very anxious about starting level design as its something I have very limited experience in. I raised this with Giovanni (Rubino, G., 2021) during our supervisor meeting on 13th July and he advised that I use the #leveldesign hashtag on Twitter to seek inspiration for good level design and also the best practices in level design. He also recommended that I follow the One Level Design Twitter page which frequently posts numerous good examples of level design in both the pre-production and post production stage (Twitter, 2021).
I also did my own reading and used Level Up: The Guide to Great Video Game Design (Rogers, S., 2014) as well as this great article by Mike Barclay (Barclay, n.d.) to look at best practices when drawing up levels, so that they are exciting and fun to play,
After speaking with Luke Perry, the other designer, (Discord, 2021) we decided to move our focus away from the hub level for the time being and instead focus on the other levels so that we could work out some gameplay as well as the mechanics for the game. We agreed that I would work on the second level and he would work on the third level and we would refine the hub level together.
By the second level, the player has already got the bouncy material and they will have unlocked the metal material in the previous level.
Skecthing the level
For the second level, I wanted to design something that makes use of both the bouncy material for making objects bouncy so you can jump higher and also the metal material which makes objects heavier.
Through sketching, I came up with the below level design. The player needs to use movable cubes that they can use to reach higher platforms through making them bouncy and they also need to use the metal material to make cubes heavier so they can push down buttons that unlock doors.

The resulting design consisted of several different levels that the player had to get around so that they can move two cubes into the same area.
The object of the level is to unlock a hole in the ground that gains the user access to the potion that will grant them the third material ability – the cloud ability which allows them to turn water into cloud to clear a passage. The cloud ability could also be used to create platforms that the player can step on.
To determine whether the level I had drawn on paper was indeed practical, challenging and fun, I could only determine this by creating it in Unity (Unity, 2021) and then testing it.
Blocking out my level in ProBuilder
While I have 3d modelling experience that I have demonstrated previously, I had little experience modelling or building levels in Unity.
To block out my level, I installed and taught myself a plugin called ProBuilder which allowed me to make quick models (Brackeys, 2021). I used this to block out my level according to my sketch. Here is the result.

Models made in procreate come with the components that allow the player to interact with them or make contact with them such as Mesh Colliders and Box Colliders, so I did not need to add these.
I also used some of the blockout models we had attained for the showcase level that we made for the mock pitch and used these to create stairs and extrusions in the wall that the player could change to different materials.
In order to test this level, there were some functionalities that I needed to add in order for the level to be playable, let alone testable.
I spoke with Georgi, one of our programmers and outlined the functionality that this level would require:
- Cubes and other ‘selectable’ objects that can be changed
- The player, complete with first person view and the ability to pick up cubes and change the materials of objects
- The ability to use buttons that have a metal cube dropped on them to unlock doors
The former two of these had already been created, so Georgi was able to talk me through bringing in the prefab for the player into the scene and then applying the ‘selectable’ label to objects that the player could change the material of.
As for the third of these, Georgi wrote some script for me that would create the functionality that would unlock doorways, when a cube had been dropped on its assigned button. The final doorway, which is actually in the floor required two cubes to unlock as this is where the player retrieves the potion, thus completing the level.
He then showed me how to assign doorways to the buttons that it had created, which would cause its transform property to change and allow the player to go through.
Once I had gone through the level and worked it out, I began testing the blockout level, here is the outcome…
This level played very well. It was certainly fun and challenging. A lot of the challenge within this level revolved around locating the corresponding buttons and doors, as well as timing the jumps between platforms correctly to get around the level. The metal function also played an important role in unlocking different parts of the level.
Making the level look good
Once I was satisfied with the functionality of the level, I now needed to consider both the aesthetic of the level and also how the theme of sustainability is tied into the level.
Regarding the latter, I had trouble thinking about this, but after doing some ideation with Luke over discord, we came up with the idea of having pathways made of vine blocking areas, instead of doors and that, when you push buttons, the vines clear away, thus weakening environmental and natural parts of the level.
Unfortunately, as the project was delayed by a few weeks and owing to the restrictions we all have because of various commitments, we did not have time to model environments from scratch so we had to rely on assets from the Asset Store in Unity. We downloaded a whole pack of assets for an ancient temple, which included walls, floors, staircases, flora and some miscellaneous items. Although they were free, they were very high quality and there was a huge selection to choose from.
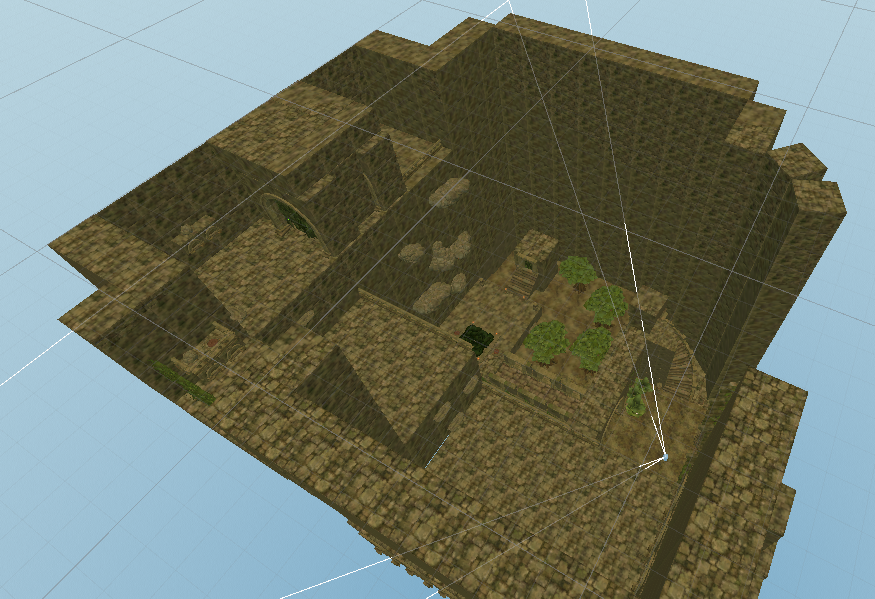
I now needed to bring in assets to build the final level, using the original ProBuilder model as a blueprint. The main challenge I had here were picking the assets the were the right size and shape to fit the blockout of the level, a bit like a game of Tetris (Pajitnov, 1984). I also frequently needed to move around various assets and compromise on the size of different parts of my level to make it work. Although this took me some time, was largely a trial and error session and I did need to make alterations throughout to make sure everything fit, I managed successfully rebuild my level using the assets we had obtained. The results of this were actually very rewarding.
Z-Fighting
One thing which I did have a lot of challenge with at first was something which is known as z-fighting, in which causes a glitchy pixelated effect in areas where the meshes of two or more models overlapped slightly.
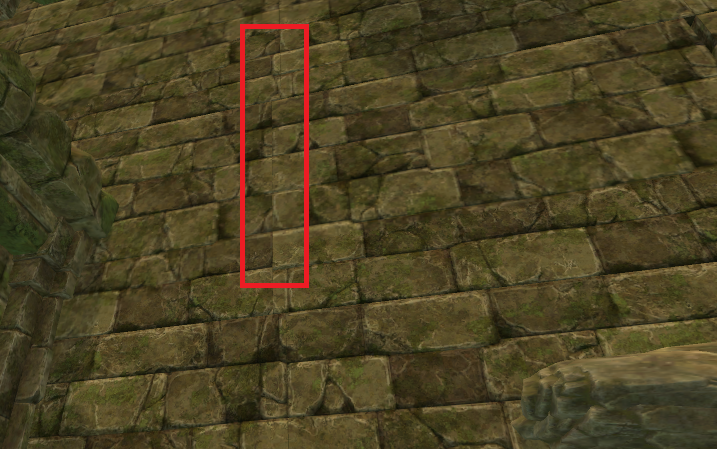
This was particularly common on the walls and floors which were created through the slotting together of multiple of the same or similar tiles. When I asked my team to test the level for me, they raised this issue and advised the I use the snap tool to ensure that there is not this overlap. I also discovered that I could remove a lot of the z-fighting by selecting all the rows and columns of tiles on a wall, one-by-one and setting their transforms to the same number. This number also needed to be a whole number to ensure it aligned within the squares of the grid.
Refining the level further and then testing
I added some plants and some ornaments around the place to make the level more aesthetically pleasing to the player. The asset pack even included a mist prefab that I placed over the final trapdoor to create a sense of atmosphere.
I tested my level again to ensure it still worked was still just as challenging. Here is the result…
Replacing cubes with rocks
My team also made some changes to cube prefab, which meant it now resembled a rock rather than a cube and therefore fit with the scenery of the game more. When this change was made, it reflected in my level too.
Vine doors
As you can see in the video above, most of the scene that the level takes place in had been implemented. However, there was one element that was outstanding. The only part of the original blockout that was still in place were the placeholder doors. These needed to be replaced by vines that would block the player’s path.
The code that Georgi had written had originally been set to make the doors transform on the Y axis. What I originally wanted was to replace this with vines that rotate upwards or outwards to allow the player past. However, Georgi and I came up with a functionality that would cause these vines to disappear, as well as a visual effect that illustrated this using texturing.
This would involve redoing some of the script Georgi had created and creating an additional script. Prior to this, Georgi had gone away and written the script, but this time, I decided to work with Georgi on the script, with his guidance as while programming may not be my specialism, I am willing to educate myself in this area as it would be beneficial both for the project and in the long term.
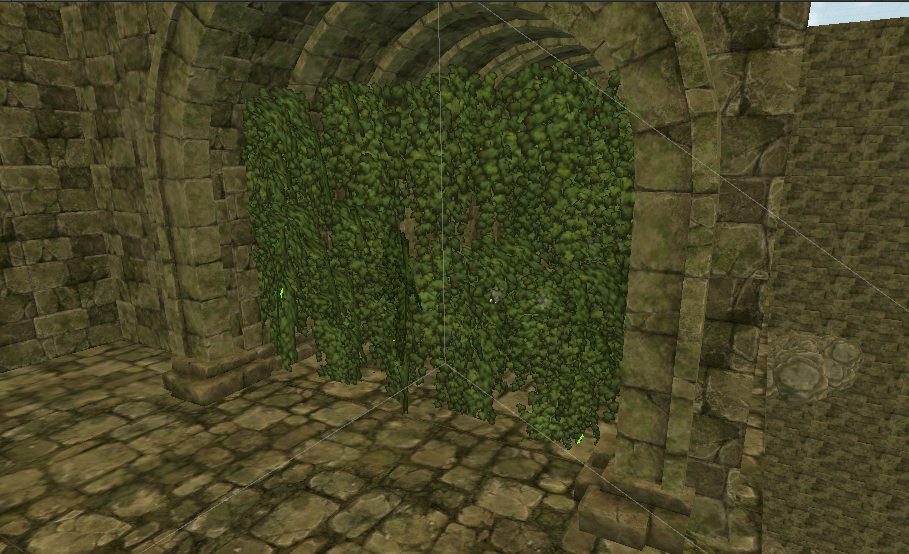
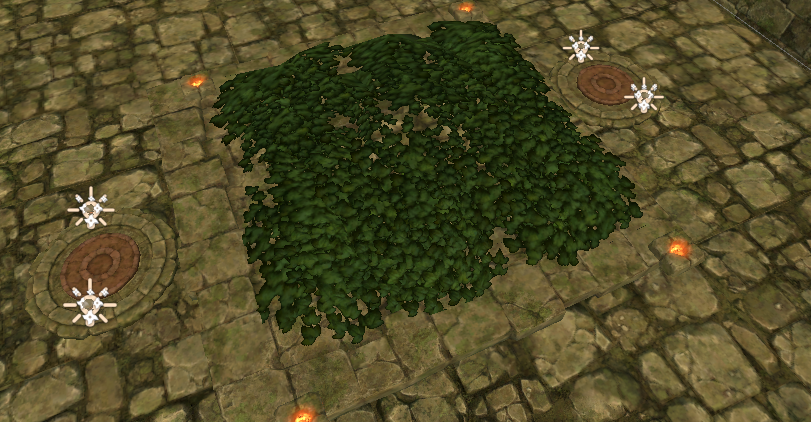
To set this up, I replaced each of the placeholder doors with some empty gameObjects and into these gameObjects, I added the mesh for several bits of greenery to create doors. I also added a Box Collider to ensure the player could not just walk through.
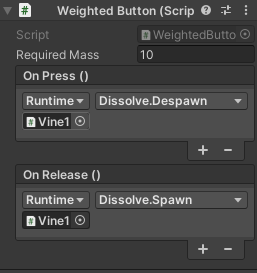
The assets pack also came with an animated shader that could be used to animate textures to make it seem as though they disappeared, so what we needed to do was create a script that was triggered when a corresponding button had been weighted down and would result in the dissolve animation playing and the Box Collider turning off, allowing the player to pass through.
Georgi and I worked on this script together that would make this happen. Georgi also talked me through the script as well as what each declaration meant.

Final outcome
Here is how the level looks now.
So far, made great progress. The only things that are outstanding in the level are that the cloud ability can be used, even though it should be locked at this point, there is still some z-fighting and I also need to add a potion to the pit the user locks at the end.
References
Barclay, M., n.d. My Level Design Guidelines | Michael Barclay – Level Designer. [online] Mikebarclay.co.uk. Available at: <http://www.mikebarclay.co.uk/my-level-design-guidelines/> [Accessed 15 July 2021].
Brackeys, 2021. MAKING YOUR FIRST LEVEL in Unity with ProBuilder!.
2021. Discord. Discord, Inc. [Software]
Pajitnov, A., 1984. Tetris.
Rubino, G., 2021. Weekly support session with supervisor.
Rogers, S., 2014. Level Up! The Guide to Great Video Game Design, 2nd Edition. 2nd ed. Chichester: WIley, pp.209-255.
Twitter. 2021. #leveldesign. [online] Available at: <https://twitter.com/hashtag/leveldesign> [Accessed 13 July 2021].
Twitter. 2021. One Level Design. [online] Available at: <https://twitter.com/oneleveldesign> [Accessed 13 July 2021].
Unity Technologies. 2021. Unity (2021). [Software]
One Reply to “Designing and building the second level”